BGMI Squad Strategy
Team Coordination That Wins Squad Fights
In Battlegrounds Mobile India (BGMI), a squad can have great aim and still lose a fight. One player rushes ahead, another stays behind, and a third is unsure where the enemy is. Suddenly, the team is fighting four separate battles instead of one.
The strongest squads make their decisions together. They share useful information, move with a plan, and help each other at the right moment. That matters on both Erangel and Miramar, even though the maps reward different styles of play.
This guide breaks down practical squad tactics—from assigning roles to handling the final circle—using simple steps that players can practice in their next match.
What does good BGMI squad coordination mean?
Squad coordination means acting on the same plan and sharing clear information while the match changes.
It does not mean that one player gives orders every second. It means everyone understands:
- Where the squad is going
- Which enemy or area is the priority
- When to fight, hold, or retreat
- Who needs help and who can provide it
A quick callout like “Two enemies behind the rock, 100 meters, moving left” gives teammates something they can act on. A vague call like “They’re over there!” makes them guess.
Give every player a simple role
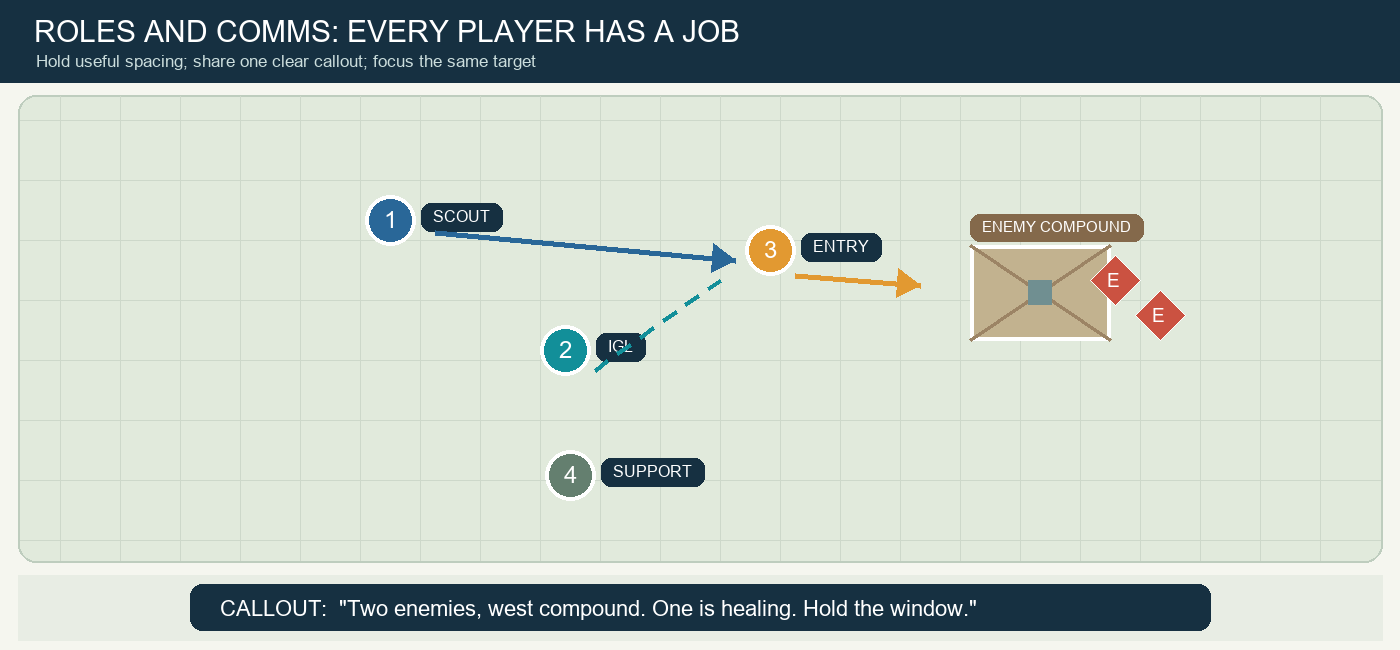
Roles help prevent confusion, but they should stay flexible. A player with the scout role can still fight, and the support player can still lead a push.
| Role | Main job | Useful callout |
|---|---|---|
| IGL (in-game leader) | Chooses the plan and helps the squad commit | “Hold this ridge, then rotate south.” |
| Scout | Checks nearby terrain and spots threats | “One team on the next hill, east side.” |
| Entry fragger | Starts a push when the team is ready | “I’m pushing after the knock.” |
| Support | Covers teammates, carries useful supplies, and helps with revives | “I’m smoking the revive.” |
The IGL should make clear calls without turning every moment into an argument. Teammates should share what they see, then follow the chosen plan unless new information makes it unsafe.
Keep callouts short and useful
A good enemy callout answers three questions:
- Where are they?
- How many did you see?
- What are they doing?
For example: “Two enemies, west side of the red house, one is healing.” Then add what you plan to do: “I’m holding the window.”
Avoid talking over teammates with guesses, complaints, or repeated warnings. During a fight, clear information is more valuable than loud information.
Before the fight: win the position
A squad should not charge just because it spotted an enemy. First, check whether the team has cover, a safe path, and enough players ready to fight.
Before engaging, ask:
- Are all four teammates close enough to help?
- Do we have cover, or are we crossing open ground?
- Can we see more than one enemy?
- Is another squad likely to hear the fight?
- Can we leave if the plan goes wrong?
If most answers are bad, wait, reposition, or take a safer route. A fight you avoid can be a better decision than a fight you win with one teammate left.
During the fight: focus your fire
When the squad spreads damage across several enemies, opponents have time to heal or escape. When teammates focus on the same target, they can create a knock and turn the numbers in their favor.
A simple team sequence:
- Spot and call the target.
- Get into cover and line up shots.
- Have one player start the engagement.
- The others fire on the same enemy or cover the push.
- If the team gets a knock, decide together whether to push or hold.
Don’t sprint forward just because an enemy is knocked. Their teammates may be waiting nearby, and the knocked player may be bait. First check the positions you can’t see.
If the enemy revives behind cover, your squad may gain time to move, heal, or take a better angle. You do not always need to chase.
Use cover and angles together
Good squads make it hard for enemies to aim at everyone at once. Instead of standing shoulder-to-shoulder behind one small rock, take nearby positions where teammates can still help each other.
One player can hold the front while another watches the side. A third can look for a safe angle without moving so far away that the squad cannot support them.
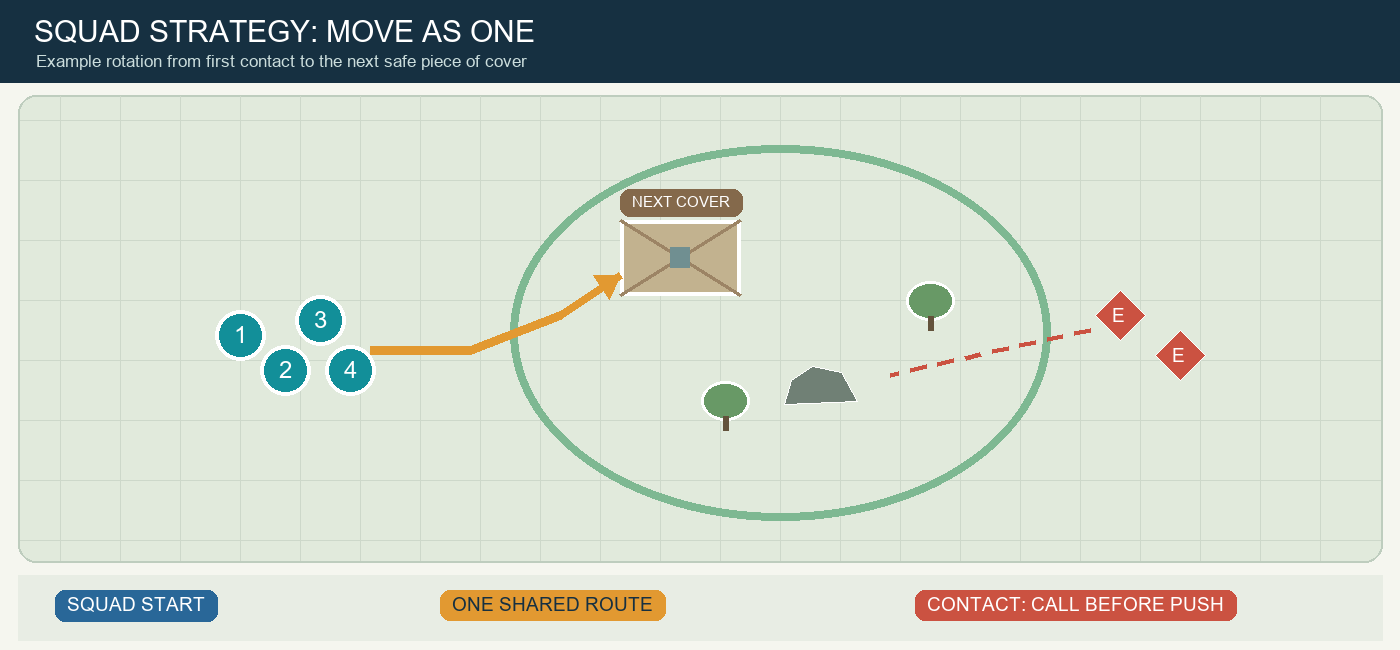
Don’t expose the whole squad to the same enemy angle. If one position becomes dangerous, move to the next piece of cover together or in pairs.
Smoke grenades can help with movement, revives, and retreats, but smoke does not make a location safe by itself. Enemies may fire into it or watch where you come out. Use it to reach cover or break a clear line of sight, then move with a plan.
Erangel strategy: use buildings, ridges, and trees
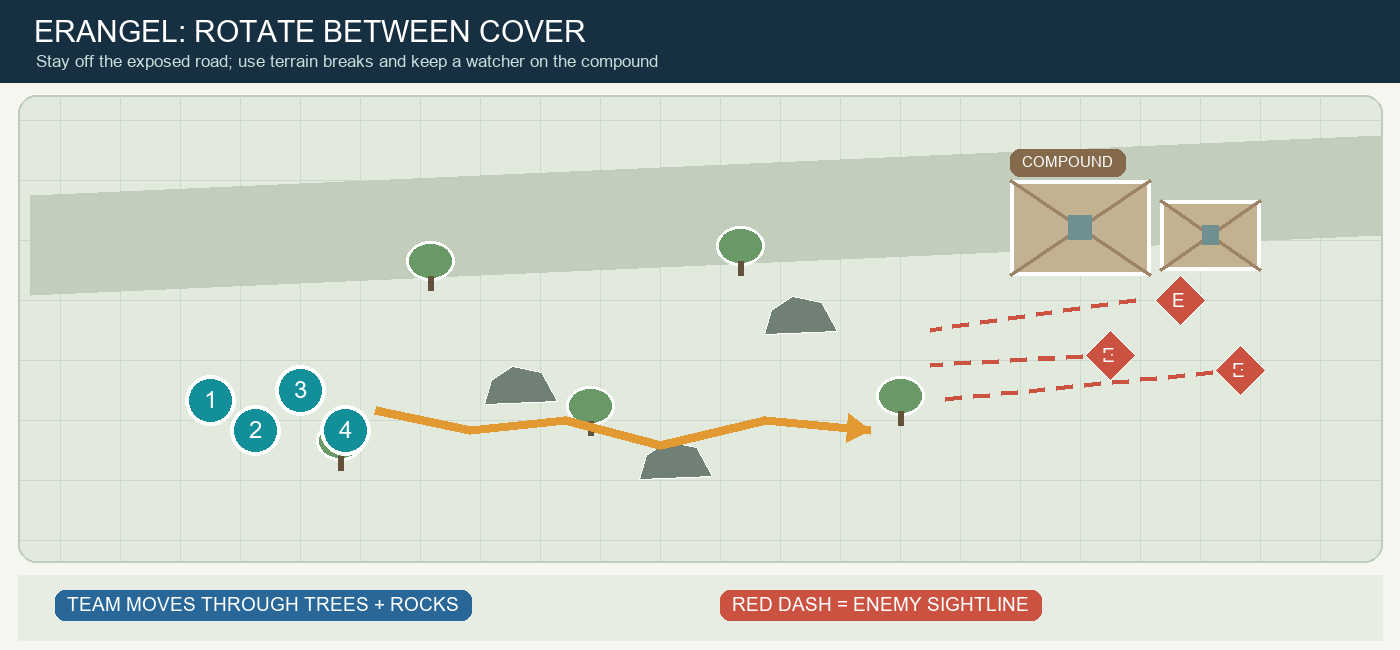
Erangel has towns, compounds, fields, forests, and rolling hills. The terrain changes quickly, so squads should think about what cover lies between them and the next safe area.
Fighting around compounds
Buildings offer protection, but they can also trap a squad if enemies control the exits. Before pushing a compound:
- Check windows and nearby buildings.
- Look for a safe route to the walls or other cover.
- Keep one teammate watching for a third-party squad.
- Don’t let players enter the building one at a time.
If the enemy holds a strong building, try to pressure it from more than one direction while staying close enough to help. If the approach crosses open ground, waiting for the zone or finding another route may be smarter.
Rotating across open ground
A car can help the squad cross a dangerous area, but driving straight at a compound may announce your arrival. Look for a landing spot with cover and an exit route.
When moving on foot, use trees, rocks, dips, and ridges to break up the enemy’s view. If the whole squad is caught in the open, don’t stop in a line and return fire from bad cover. Find the nearest terrain break, then regroup.
Miramar strategy: respect distance and high ground
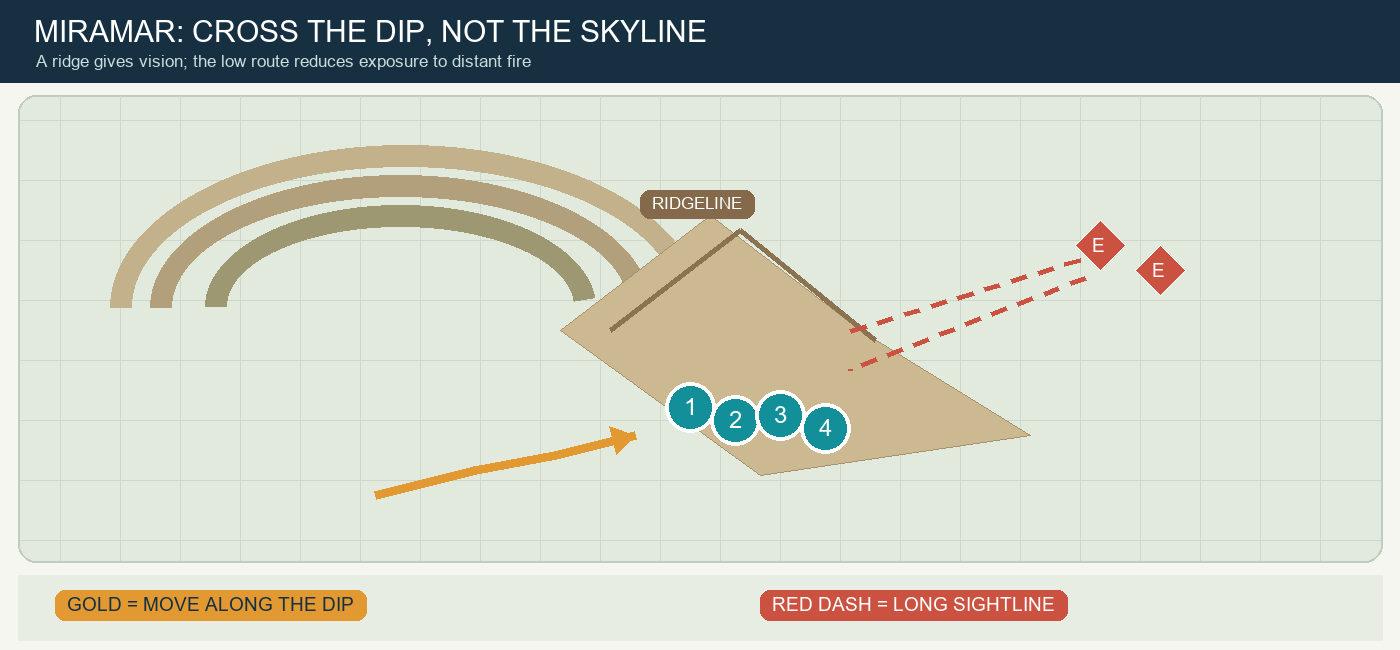
Miramar has long sightlines, open slopes, cliffs, and compounds separated by wide spaces. Squads can be spotted from far away, and crossing an exposed hill can leave players vulnerable.
Move from cover to cover
Before leaving a building or ridge, decide where the squad is moving next. Avoid running across a hilltop if you can travel along its side, use a dip, or take a route behind terrain.
High ground can give your squad a better view, but it can also make you easy to spot. Check whether another ridge overlooks your position, and avoid standing against the skyline for too long.
Don’t chase every enemy
On Miramar, shooting at a distant squad may start a fight your team cannot finish. The enemy could be too far away to push, while another squad moves into your area.
Shoot when you have a good angle, a clear target, and a reason to engage. Otherwise, use the information to plan your rotation and keep moving.
Revives and retreats: protect the whole squad
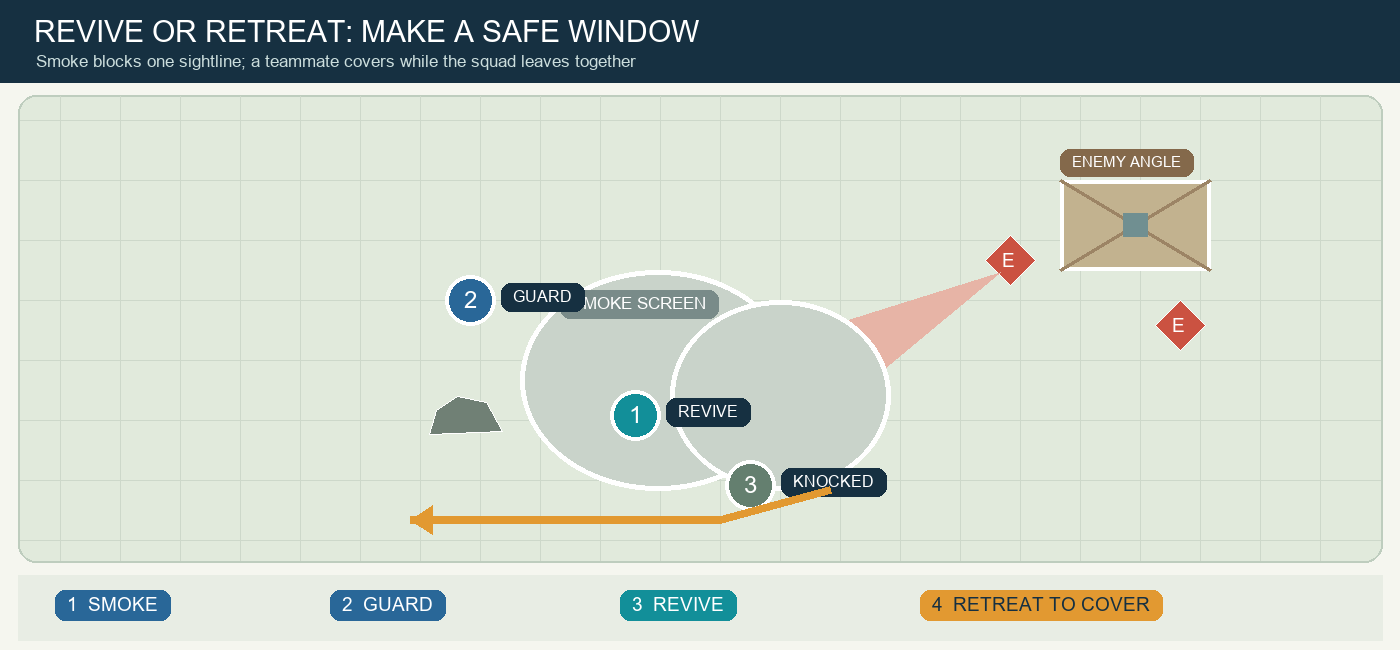
A teammate getting knocked does not mean everyone should rush in blindly. First, check whether the knocked player is behind cover and whether enemies can see the revive spot.
- If the area is covered: one player can revive while teammates watch likely approaches.
- If enemies have a clear angle: use smoke or move to a safer position before reviving.
- If the squad is outnumbered: retreat together if there is a safe route.
A rescue attempt that knocks two more teammates can end the match. Sometimes the best way to help is to keep the other enemies busy while one teammate moves the knocked player to cover.
If you need to retreat, call it clearly. Don’t leave one player behind without warning. A planned regroup gives the squad a chance to heal and fight again; a panicked split often turns one bad moment into four separate losses.
Endgame: play the circle, not your ego
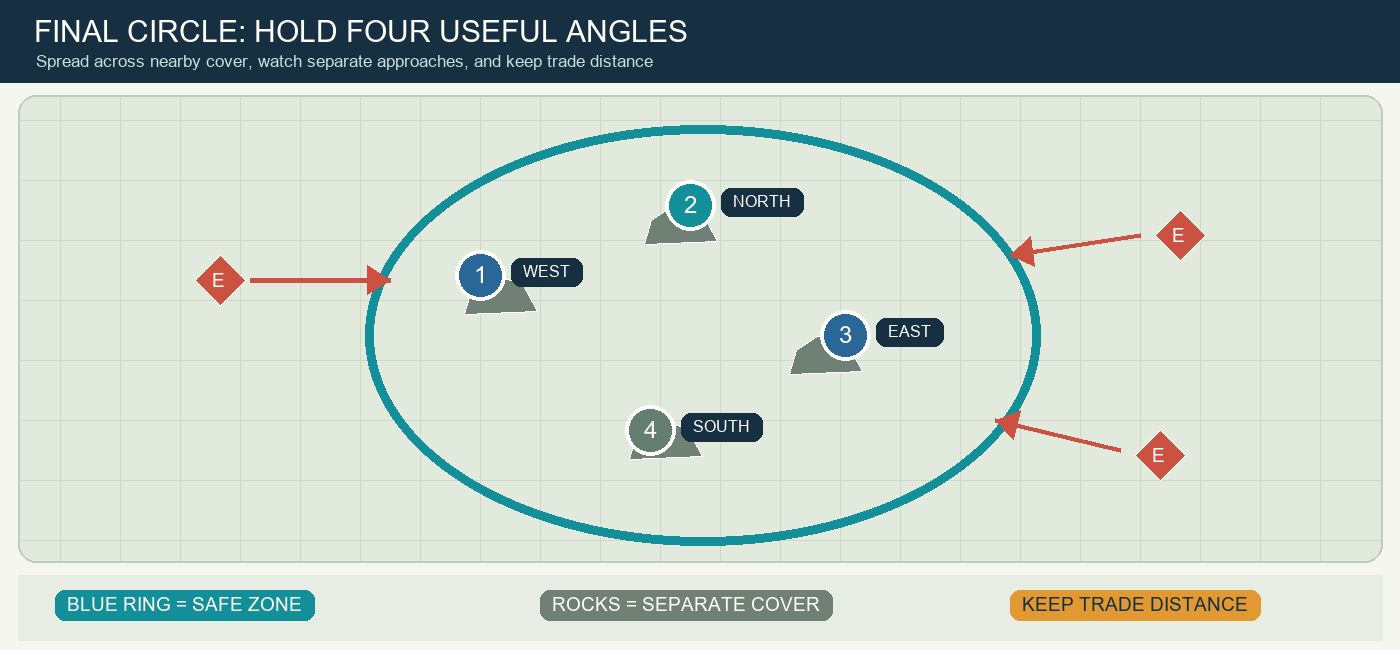
As the play area gets smaller, squads have less room to escape and more enemies nearby. A fight can attract opponents from several directions.
In the final circles:
- Stay close enough to trade help, but don’t crowd into one spot.
- Watch likely approaches instead of staring at one enemy.
- Move before the zone forces you across exposed ground.
- Avoid shooting unless it gives you a useful advantage.
- Keep track of who has cover, healing items, and a safe route.
The goal is not to prove that your squad can take every fight. The goal is to reach a position where the team can survive the next one.
A five-minute practice drill
In a training match or a normal game, practice these steps with your squad:
- Pick one player to make the main calls.
- Have every player give a short enemy callout with location and number.
- Choose one target and focus fire together.
- Practice moving from one piece of cover to another.
- Practice a retreat and regroup without splitting up.
After the match, talk about one moment when communication helped and one moment when the squad got separated. Keep it specific: “We pushed before the other two players were ready” is more useful than “We played badly.”
Final takeaway
On Erangel, use buildings, trees, and rolling ground to move safely. On Miramar, respect long sightlines, avoid exposed crossings, and think carefully before starting a distant fight.
On both maps, the core habits are the same: call clearly, focus together, use cover, and regroup when the plan changes. Choose one habit to practice in your next BGMI match, then build from there.